First, I recommend to
everyone that read original usage txt files suplied with SW. I
added them to end of this page, for making it easier.
Here, I focus mostly on things not written there, based on my experiences, and how to avoid possible errors.
Program tries to autodetect most of things. It is good for beginner user, but not really for experienced ones. The strategy is simple: if not sure in something, use imaging of everything available on disk. So, program will image really single sided floppy double sided if side B is formatted, even if there is not any user data (all is 0 or some usual format pattern).
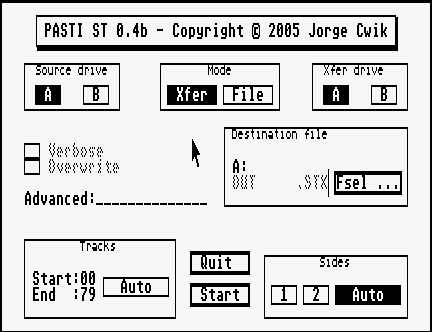
What is possible to set manually is well visible. Just to say that commercial SW practically never goes over track 79. Auto will usually go on 82 tracks (00-81). And there is field for typing Advanced commands, settings. And it is something secret - at least I can not call it differently, since authot willing not to say anything about - after many years.
How to decrease chances of making bad STX image ?
This is something very important, and with reason - I saw many STX images with errors. Usual reason is bad shape of floppies or used floppy drives. So, cleanliness of both is essencial. Here comes the catch: "my floppy is perfectly clean - I kept it in dry, closed, etc". Still, floppy may be not well readable. I digged out my original of game Voyager after several years and made STX image. And it worked not in Steem. Then imaged using another floppy drive.... Only with fourth drive it was OK. And guess what ? After it, imaging was OK with firstly used floppy drive too. The explanation is simple in fact: floppy was not clean. But dirt was invisible, and is actually some kind of tiny film on floppy surface - likely vapourisation of plastic case.
So, the rule #1: do multiple imagings in empty (without real transfer) before final one, and transfer/save only final one. Especially, if floppy was not used for years.
Rule #2: Test image(s) as much possible. Fact that game starts, and you can play level 1 is fine, but errors may appear in later stages. Potential problem are copy protections with delayed effect - mostly present by games published after 1989. Not to mention that some games have special copy protections at latest levels.
If test fails, image again - may do 2-3 images at once, and test all them - may happen that some will be OK.
If nothing helps, still don't throw your floppy - may be good later - with another HW, for possible combining of flawless image from multiple sources.
Send image(s) to Atarimania - people there have more experience than usual user, + there are better chances to discover errors if image is used my more people.
About 'preservation team' mentioned in original usage: obviously it works not - as many other ideas in Atari waters, which require pretty much effort and time.
Instead it, I see Atarimania and myself as those who can and will judge condition of images.
List of wanted/missing images for games
STX in details, with SW for image analysing
P. Putnik , Latest update: Jan. 2013.
Original usege:
Pasti Imaging Tool for ST Version 0.4 beta
Copyright c 2004, 2005 by Jorge Cwik
http://pasti.fxatari.com
Pasti ST is an imaging tool that produces disk file images of any ST disk,
including non-standard, exotic formats and copy protections. It runs on any
ST computer, with the only requirement of one double-sided drive.
Pasti ST needs a standard 8Mhz ST CPU. Any CPU accelerator or cache, if
present, must be disabled. This includes the built-in one in the Mega STe.
It doesn't run on TT or Falcon computers.
Pasti images can be used on ST emulators using Pasti.Dll. Pasti.Dll is
currently supported by latest versions of Steem and Saint.
The built-in defaults are suitable for most cases, and only advanced users
would want to override them.
Please Write Protect your original disks. The imaging tool rejects source
disks that are not write protected. But just in case and as a general rule,
never ever write to an original disk. Keep them always write protected.
Pasti ST has two different modes of operation, transfer or file mode.
Transfer mode works in cooperation with a Windows program. It will
automatically transfer the file image to a PC. File mode leaves a file on
an ST drive, normally a hard disk.
Transfer mode.
This is the mode that most users will want to use. This mode wholly
automates the creation and transfer of the image to a PC. No hard disk or
ram disk is needed at the ST; only a blank floppy is required. The transfer
is performed in cooperation with a Windows program, PastiTools. A detailed
description of Transfer Mode is included with PastiTools.
File mode.
This mode is usually for advanced users that have an ST hard disk. In file
mode the whole image must fit on the destination drive. There is no swap of
floppies or user intervention. The destination drive will normally be a
hard disk. But a ram disk, if big enough, can be used instead.
After the file image is created, the user is on its own to transfer the
image to a PC. This could be done with a null-modem cable, a special
crossed parallel cable or with floppies.
Preservation
Pasti ST is an imaging tool. Standalone by itself it can't be considered a
preservation tool. Preservation tools are provided separately, normally to
preservation teams. The Pasti preservation tools are required to validate
and verify the integrity of the image.
The separation between imaging and preservation is intentional, and it
gives the user the maximum flexibility. Any disk can be imaged and used
immediately. However, if you own an important collection or rare software
you are encouraged to contact a Pasti preservation team. Contacts for Pasti
preservation teams are provided in our web site.
Preservation teams mark, and optionally sign, the image. The standard Pasti
tools inform the user if a Pasti image undergone a verification process by
a preservation team or not.
Write back Images to physical disk
Pasti ST is read only software. It doesn't write back Pasti images to
floppies. There are other Pasti tools for writing back images, but they
require special hardware. The Discovery Cartridge for the ST and the
Catweasel for the PC are currently supported. Write back on a plain PC or
ST is not supported.
Beta warning
This is a beta version. All precautions associated with a preliminary
release should be taken. It is possible that the file format will be
changed, and beta images might be incompatible with the final (non-beta)
Pasti release. A converter will be provided in that case.
What is a disk image?
A disk image is a file that contains all the data from a physical disk.
Most emulators cannot access physical floppies directly. They use disk
images instead. You can consider a disk image, if you want, as an archive
of the floppy as you could do with archives/compressor as ARC, ZIP, etc.
But the disk image contains more detailed data, and at a lower level, than
a normal archive. Many ST games disks do not have files at all, they have
just raw data on the disk's sectors.
A disk image also has all the advantages that any other file has. It can be
easily stored on a hard disk, burned to CD, archived, compressed, sent over
the Internet, etc. Additionally there are tools to convert from a physical
disk to a disk image and vice versa.
For many years ST users used a couple of disk images formats. The more
popular were ST and MSA ones. They are both very similar and describe the
disk at the standard sector level. So these formats works fine for disks
that have more data than just the disk's files.
Pasti introduces a new disk image format that describes the disk at an even
lower level. This way exotic and copy-protected formats can be handled as
well.
Legal disclaimer.
Pasti Imaging Tools are Copyright c 2004, 2005 by Jorge Cwik.
All rights reserved.
THE SOFTWARE HERE DESCRIBED IS PROVIDED "AS IS". NO WARRANTY OF ANY KIND IS
GIVEN OR IMPLIED.
Pasti Tools for Windows
Copyright (c) 2004, 2005 by Jorge Cwik
http://pasti.fxatari.com
Transfer Mode
PastiTools works together with Pasti Imaging tools operating in transfer mode.
Before using transfer mode you must setup a "Transfer Floppy Disk". This normally needs to be done only once. Use the following procedure:
The first step is to format a floppy disk. You can format the disk on the PC or the ST. Disregarding what tool or computer you use to format the disk, the disk format must be compatible with both machines. In most cases this means DD 720k, 80 tracks, 2 sides, 9 sectors per track. Windows usually can't access disk with ST extended formats. It is normally better to format the disk at the PC. For most Windows versions you can format a floppy disk using Windows Explorer, the exception is Windows XP. On Windows XP it must be done at the command prompt (also known as Dos Box). At the command prompt, and assuming the first or a single floppy drive, type "format /T:80 /N:9 a:".
After formatting the disk, it is recommended verifying that you can read the disk correctly in both computers. Then run Pasti Tools on the PC and select initialize transfer disk. The program will write some small files to the transfer disk. Once this is done, and unless the disk gets damaged, you will not need to perform the initialization again. It is recommended you label the disk as "Pasti transfer disk". Using a HD disk is not recommended. Use a DD/DS disk.
Running Transfer Mode:
Run PastiTools at the PC and the Imaging Tool at the ST.
On the PC start Transfer. On the ST, make sure "Xfer mode" is selected and start the imaging. Pasti reads from the source disk as much as possible; then it will ask you to insert the transfer disk. A partial file image is written to the transfer disk. Once prompted, take the transfer disk to the PC. At the PC, PastiTools reads the transfer disk and write to the PC hard disk. This process might need to be repeated a couple of times until the whole source disk is read and a complete file image is created on the PC.
Here, I focus mostly on things not written there, based on my experiences, and how to avoid possible errors.
Program tries to autodetect most of things. It is good for beginner user, but not really for experienced ones. The strategy is simple: if not sure in something, use imaging of everything available on disk. So, program will image really single sided floppy double sided if side B is formatted, even if there is not any user data (all is 0 or some usual format pattern).
What is possible to set manually is well visible. Just to say that commercial SW practically never goes over track 79. Auto will usually go on 82 tracks (00-81). And there is field for typing Advanced commands, settings. And it is something secret - at least I can not call it differently, since authot willing not to say anything about - after many years.
How to decrease chances of making bad STX image ?
This is something very important, and with reason - I saw many STX images with errors. Usual reason is bad shape of floppies or used floppy drives. So, cleanliness of both is essencial. Here comes the catch: "my floppy is perfectly clean - I kept it in dry, closed, etc". Still, floppy may be not well readable. I digged out my original of game Voyager after several years and made STX image. And it worked not in Steem. Then imaged using another floppy drive.... Only with fourth drive it was OK. And guess what ? After it, imaging was OK with firstly used floppy drive too. The explanation is simple in fact: floppy was not clean. But dirt was invisible, and is actually some kind of tiny film on floppy surface - likely vapourisation of plastic case.
So, the rule #1: do multiple imagings in empty (without real transfer) before final one, and transfer/save only final one. Especially, if floppy was not used for years.
Rule #2: Test image(s) as much possible. Fact that game starts, and you can play level 1 is fine, but errors may appear in later stages. Potential problem are copy protections with delayed effect - mostly present by games published after 1989. Not to mention that some games have special copy protections at latest levels.
If test fails, image again - may do 2-3 images at once, and test all them - may happen that some will be OK.
If nothing helps, still don't throw your floppy - may be good later - with another HW, for possible combining of flawless image from multiple sources.
Send image(s) to Atarimania - people there have more experience than usual user, + there are better chances to discover errors if image is used my more people.
About 'preservation team' mentioned in original usage: obviously it works not - as many other ideas in Atari waters, which require pretty much effort and time.
Instead it, I see Atarimania and myself as those who can and will judge condition of images.
List of wanted/missing images for games
STX in details, with SW for image analysing
P. Putnik , Latest update: Jan. 2013.
Original usege:
Pasti Imaging Tool for ST Version 0.4 beta
Copyright c 2004, 2005 by Jorge Cwik
http://pasti.fxatari.com
Pasti ST is an imaging tool that produces disk file images of any ST disk,
including non-standard, exotic formats and copy protections. It runs on any
ST computer, with the only requirement of one double-sided drive.
Pasti ST needs a standard 8Mhz ST CPU. Any CPU accelerator or cache, if
present, must be disabled. This includes the built-in one in the Mega STe.
It doesn't run on TT or Falcon computers.
Pasti images can be used on ST emulators using Pasti.Dll. Pasti.Dll is
currently supported by latest versions of Steem and Saint.
The built-in defaults are suitable for most cases, and only advanced users
would want to override them.
Please Write Protect your original disks. The imaging tool rejects source
disks that are not write protected. But just in case and as a general rule,
never ever write to an original disk. Keep them always write protected.
Pasti ST has two different modes of operation, transfer or file mode.
Transfer mode works in cooperation with a Windows program. It will
automatically transfer the file image to a PC. File mode leaves a file on
an ST drive, normally a hard disk.
Transfer mode.
This is the mode that most users will want to use. This mode wholly
automates the creation and transfer of the image to a PC. No hard disk or
ram disk is needed at the ST; only a blank floppy is required. The transfer
is performed in cooperation with a Windows program, PastiTools. A detailed
description of Transfer Mode is included with PastiTools.
File mode.
This mode is usually for advanced users that have an ST hard disk. In file
mode the whole image must fit on the destination drive. There is no swap of
floppies or user intervention. The destination drive will normally be a
hard disk. But a ram disk, if big enough, can be used instead.
After the file image is created, the user is on its own to transfer the
image to a PC. This could be done with a null-modem cable, a special
crossed parallel cable or with floppies.
Preservation
Pasti ST is an imaging tool. Standalone by itself it can't be considered a
preservation tool. Preservation tools are provided separately, normally to
preservation teams. The Pasti preservation tools are required to validate
and verify the integrity of the image.
The separation between imaging and preservation is intentional, and it
gives the user the maximum flexibility. Any disk can be imaged and used
immediately. However, if you own an important collection or rare software
you are encouraged to contact a Pasti preservation team. Contacts for Pasti
preservation teams are provided in our web site.
Preservation teams mark, and optionally sign, the image. The standard Pasti
tools inform the user if a Pasti image undergone a verification process by
a preservation team or not.
Write back Images to physical disk
Pasti ST is read only software. It doesn't write back Pasti images to
floppies. There are other Pasti tools for writing back images, but they
require special hardware. The Discovery Cartridge for the ST and the
Catweasel for the PC are currently supported. Write back on a plain PC or
ST is not supported.
Beta warning
This is a beta version. All precautions associated with a preliminary
release should be taken. It is possible that the file format will be
changed, and beta images might be incompatible with the final (non-beta)
Pasti release. A converter will be provided in that case.
What is a disk image?
A disk image is a file that contains all the data from a physical disk.
Most emulators cannot access physical floppies directly. They use disk
images instead. You can consider a disk image, if you want, as an archive
of the floppy as you could do with archives/compressor as ARC, ZIP, etc.
But the disk image contains more detailed data, and at a lower level, than
a normal archive. Many ST games disks do not have files at all, they have
just raw data on the disk's sectors.
A disk image also has all the advantages that any other file has. It can be
easily stored on a hard disk, burned to CD, archived, compressed, sent over
the Internet, etc. Additionally there are tools to convert from a physical
disk to a disk image and vice versa.
For many years ST users used a couple of disk images formats. The more
popular were ST and MSA ones. They are both very similar and describe the
disk at the standard sector level. So these formats works fine for disks
that have more data than just the disk's files.
Pasti introduces a new disk image format that describes the disk at an even
lower level. This way exotic and copy-protected formats can be handled as
well.
Legal disclaimer.
Pasti Imaging Tools are Copyright c 2004, 2005 by Jorge Cwik.
All rights reserved.
THE SOFTWARE HERE DESCRIBED IS PROVIDED "AS IS". NO WARRANTY OF ANY KIND IS
GIVEN OR IMPLIED.
Pasti Tools for Windows
Copyright (c) 2004, 2005 by Jorge Cwik
http://pasti.fxatari.com
Transfer Mode
PastiTools works together with Pasti Imaging tools operating in transfer mode.
Before using transfer mode you must setup a "Transfer Floppy Disk". This normally needs to be done only once. Use the following procedure:
The first step is to format a floppy disk. You can format the disk on the PC or the ST. Disregarding what tool or computer you use to format the disk, the disk format must be compatible with both machines. In most cases this means DD 720k, 80 tracks, 2 sides, 9 sectors per track. Windows usually can't access disk with ST extended formats. It is normally better to format the disk at the PC. For most Windows versions you can format a floppy disk using Windows Explorer, the exception is Windows XP. On Windows XP it must be done at the command prompt (also known as Dos Box). At the command prompt, and assuming the first or a single floppy drive, type "format /T:80 /N:9 a:".
After formatting the disk, it is recommended verifying that you can read the disk correctly in both computers. Then run Pasti Tools on the PC and select initialize transfer disk. The program will write some small files to the transfer disk. Once this is done, and unless the disk gets damaged, you will not need to perform the initialization again. It is recommended you label the disk as "Pasti transfer disk". Using a HD disk is not recommended. Use a DD/DS disk.
Running Transfer Mode:
Run PastiTools at the PC and the Imaging Tool at the ST.
On the PC start Transfer. On the ST, make sure "Xfer mode" is selected and start the imaging. Pasti reads from the source disk as much as possible; then it will ask you to insert the transfer disk. A partial file image is written to the transfer disk. Once prompted, take the transfer disk to the PC. At the PC, PastiTools reads the transfer disk and write to the PC hard disk. This process might need to be repeated a couple of times until the whole source disk is read and a complete file image is created on the PC.