There are diverse STE HAV formats introduced by me - like 320x200, Overscan 416x228 etc. This guide gives general help for all them, but as first example we will deal with conversion to format 320x158px, 12.5 fps , because it is most interesting at moment, for people equipped with UltraSatan.
What we do is basically extraction of picture sequences from movies, videos, then converting them with special SW into Atari STE hi-color format. Need to extract audio too, and convert it to format usable on STE. Final step is multiplexing hi-color pictures and audio into HAV file - something like AVI for STE.
Our main tool will be Virtual Dub. It is very powerful, reliable, freeware and has good support, so we have many plugins available - and will need some. Note for Linux users: almost everything can be done in Linux too, for sure. But I'm not familiar with Linux SW for this purpose. Plus, SW for conversion into STE hi-color format is for Windows.
As first example, we will convert something simple and short. It is old Mpeg1 video Test.mpg , suplied with Xing player, around 1995-6. Need only Virtual Dub - it handles Mpeg1.
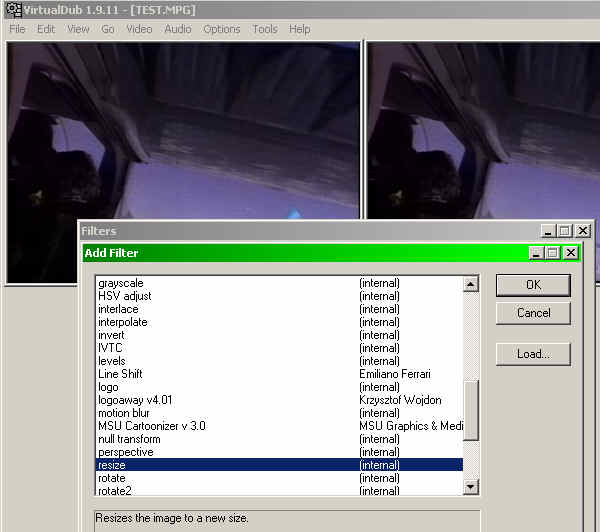
Open file Test.mpg and go to Video/Filters. Select resize :
 Then make following
setting:
Then make following
setting: 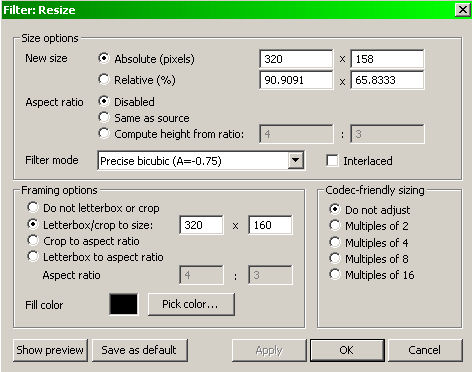
We need 320x158px, but will add 1-1 black line to top and bottom, because converters usually cut off top line. In some cases you will need to Letterbox to 320x200 (depending on SW for conversion to hi-color), then enter 320x200 in Framing options . Then will have black areas at top and bottom.
OK.OK, and you will see something like:
 Now we see
something, what is usual problem after
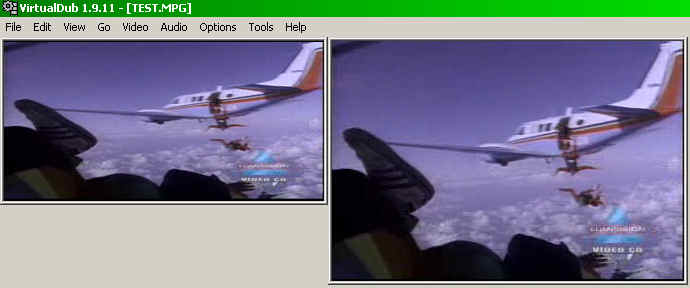
Now we see
something, what is usual problem aftersetting image size to output resolution (dictated by HW,
player res.): Aspect ratio error (output is at left here) .
In reality, it will be not so much stretched vertically on Atari
monitor/TV.
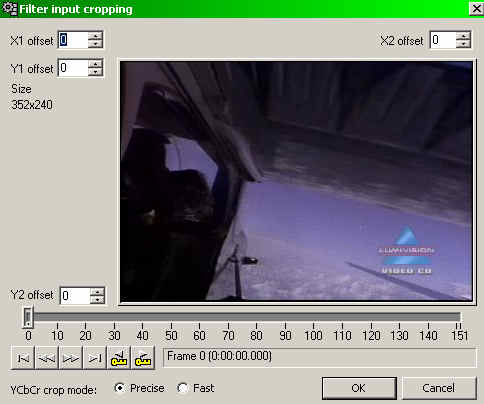
To correct AR errors we can use cropping of image edges
- in this case cropping at top and bottom, 16-16px for instance.
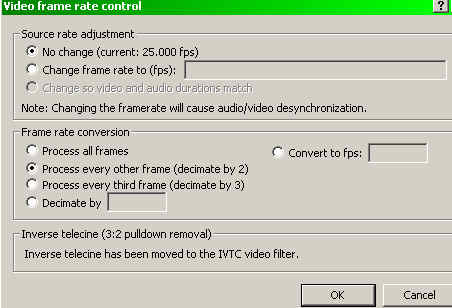
After it, we need to set proper frame rate:
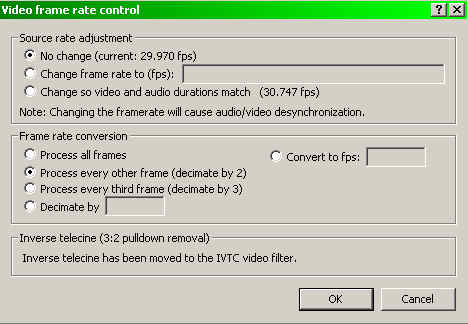 In this case, it is
as is shown left. Playback will be slower some 20%,
In this case, it is
as is shown left. Playback will be slower some 20%,because src. rate is 30fps, but we can not do better here. There are methods
which drop every 6-th frame to maintain same playback speed, but it is
ugly. And of course, change of playback speed will cause audio/video
desync - later about how to fix it. Here, it is not relevant, because we have only
background music.
30 fps source is not common today - we will see mostly 24 fps. Or in case
of TV recordings (Europe) 25fps. Why not keep 30 fps, and play on Atari
with 30 or 15 fps ? It will not happen - NTSC video mode on Atari STE is
very bad for hi-color video playback. There is no enough border space for
loadings.
Later, I will add some help how to do real and quality framerate conversion with
MVtools. You will need AviSynth too. It is not easy - command line, but is very
powerful. Mvtools generates new frames, based on motion analysis, what is
much better than frame dropping/doubling combined with blending.
Next setting is important for good looking video on Atari STE:
We need to perform color reduction to 4096 colors, together with
error diffusion. There is special, very good Virtual Dub filter for it :
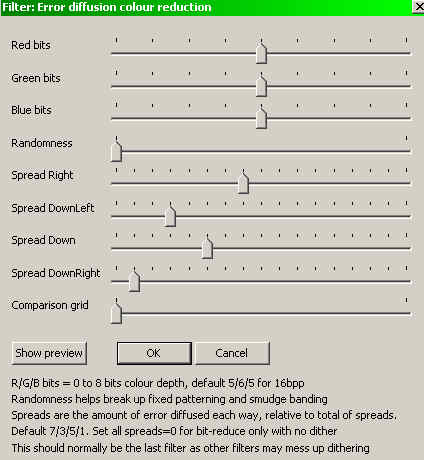
Set RGB bits to 4 as is shown. OK.
In some cases you don't need above - depending from settings
in conversion SW. Later more about ..
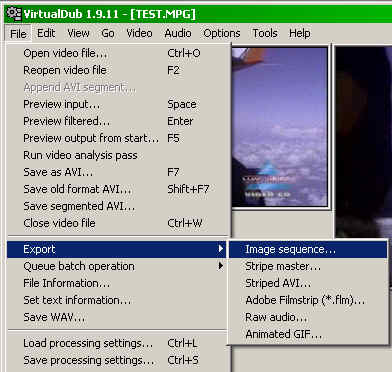
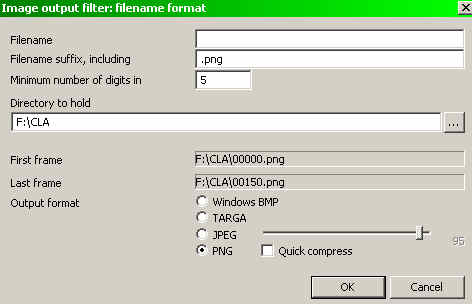
After setting all, we need to export image sequence :
Then, need to extract audio too:
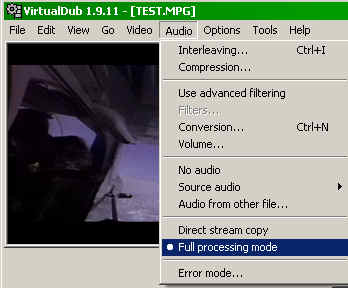
Select 'Full processing mode' - so will save as PCM, what is certainly compatible with audio editing SW.

We need yet to convert saved WAV to format suitable for STE. It is 25033 Hz samplerate, 8-bit mono, unsigned, as WAV file.
It can be done with diverse audio processing SW.
How to do it with freeware AudaCity, see here: STE background player section Preparing WAV file on PC .
Slowest part is conversion of image sequences to STE hi-color format, especially if want better quality. SW is developed by Douglas Little - Photochrome, and Cyg - HigheSTcolor . Both is under development currently, and signifficant improvement is made in last couple months. You can DL latest test versions of HigheSTcolor in forum of this site. And of course posting there your questions, experiences: Forum
I will add here downloads in few days. Just be aware that all this is very complex and hard, so don't expect miracles and fast results.
Next: usage of diverse plugins in Virtual Dub. You will need them for mp4, mov, mkv etc. formats. AVIsynth, framerate conversion with MVtools.
And: there are another ways. Ffmpeg is extremely powerful video/audio processing SW. Can extract image sequences, audio, process them ... Command line tool.
In same cases, I could extract audio only with Ffmpeg.
Old fashion Framerate conversion:
It is one of hardest parts in AV processing, conversions. Need for framerate conversion appeared first when started to show regular films on TV. In Europe, where TV standard is 25 fps, showing films shot at 24 fps is solved pretty simple, and without picture quality loss: speeding up playback speed to 25 fps. Of course, then need to speed up audio too. All it was simple with analogue technic. Bad side is 4% faster playback speed than speed of recording, what means higher pitch of audio too - some people is sensitive. But there was no other way practically.
In NTSC lands, solution was more complicated - speeding up from 24 to 30 fps would be too much, so they invented Telecine. If you duplicate every 4th frame, will get 30 from 24 fps. But it results in jerky movement. Therefore they used fact that TV frame is made from 2 fields, which are interlaced, and duplicated only 1 field at once, what looks much better. It is of course far from ideal, but that was possible in that time.
Today, with modern TVs, monitors we can have diverse framerates, and conversion is usually not necessary. What is in is upscaling fps at playback, to 50-60 fps. Our old Atari STE is capable for 25 fps, or 12.5 fps, and even 50 fps playback. 30 fps is not really possible because smaller border area. So, in case of some source with different fps, we need to convert. First example, above. was not really good solution - playback speed is 20% lower. But will see later how to do it better. Now, let see first most common case: conversion from 24 fps to 25 fps. We will do same, what TV stations did wuth films - speed up. Nothing special to do with video - just extract image sequence normally. Extract audio with Virtual Dub if possible. If it goes not, best way is to do it with Ffmpeg : ffmpeg -i src.avi out.wav (replace src.avi with your filename) - really not that hard, isn't ?
We need to speed up audio, otherwise will loose sync. It can be done with better audio processing/editing SW .
Proper audio conversion if src. is 24 fps, with AudaCity :
In most of cases exact framerate of source is 23.976 fps - and better use exact value, so will get synced audio even by longer clips.
Extract audio with Virtual Dub (or some other SW) - use full processing mode for audio, as explained above. Open it with AudaCity.:
Tracks/Stereo Track to Mono by need (if stereo wav).
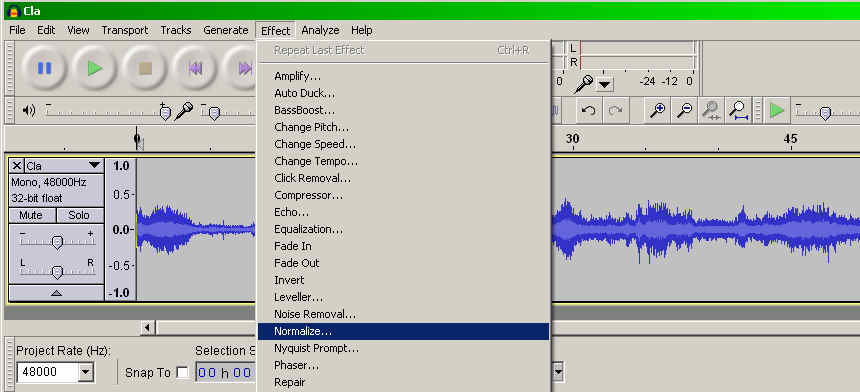
First thing to do is normalize. In some cases it is better to use Compressor - if volume varies too much.
After normalisation it is little louder, so will be less noise.
In case of 23.976 fps source, we need Effect, Change Tempo . Ratio is 25/23.976=1.042709, what makes 4.2709 % :
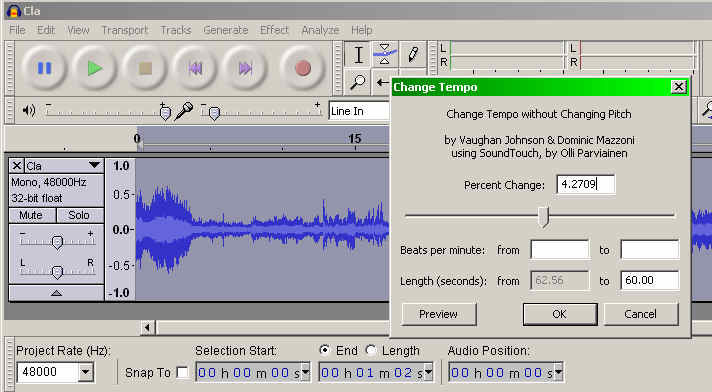
For 1500 frames we must get exactly 1 min duration audio. If doing 12.5 fps, then 1 min stays for 750 frames.
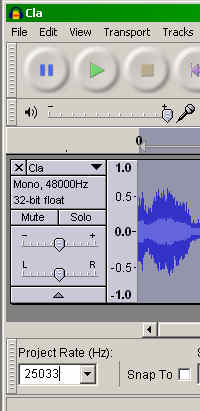
Next important thing is setting Project Rate (Hz) to 25033 :
After it File, Export :
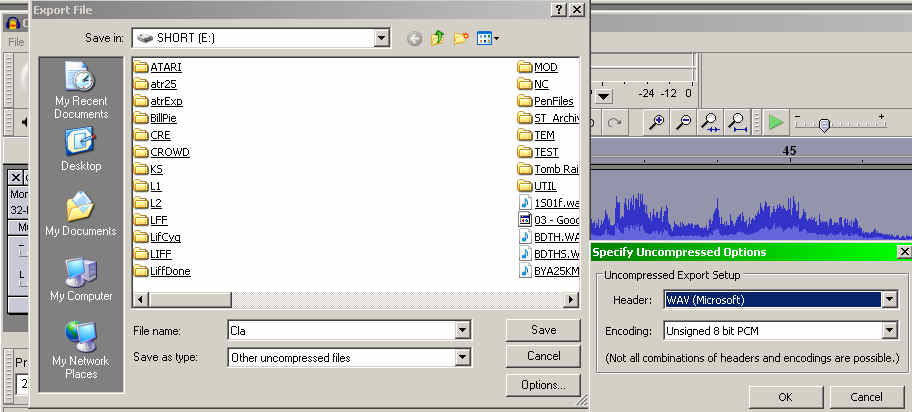
Save as type: Other uncompressed files, click on Options , set WAV (Microsoft) , Unsigned 8 bit PCM . OK, Save ...
It is proper format for STE playback.
Advanced framerate conversion:
Quality framerate conversion without changing playback speed, audio pitch, jerky movement (dropped/duplicated frames), blending ? It is possible today.
There is freeware SW called MVTools, which can generate new frames, based on motion analysis. Of course, this is not perfect - in some cases it may look not good. DL AVISynth and MVTools2 and install them. Usage is not so hard, as it may seem at first. Again, example video conversion - this time Atari ST related. Best quality one, I found on WEB. It is 30 fps, and we want to convert it to our 25 fps, or 12.5 fps (UltraSatan) , without slowing down playback.
AVISynth script:
AVISource("d:\acsPart.avi") # or MPEG2Source, DirectShowSource, some previous filter, etc
super = MSuper(pel=1)
backward_vec = MAnalyse(super, overlap=4, isb = true, search=3)
# Use block overlap, halfpixel accuracy and Exhaustive search
forward_vec = MAnalyse(super, overlap=4, isb = false, search=3)
MFlowFps(super, backward_vec, forward_vec, num=25000, \
den=1000)
Only part you need to edit/change is in first line - replace path and filename with your one. Save script with extension avs .
Open it in Virtual Dub, and go to Video, Filters, add resize :
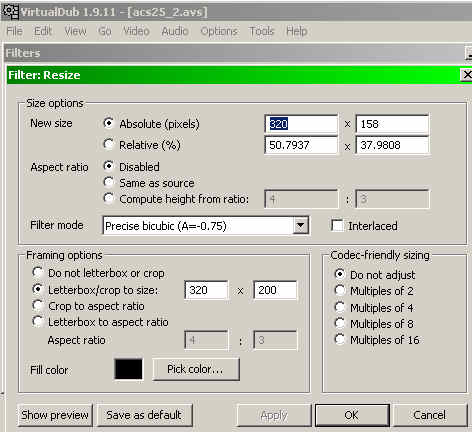
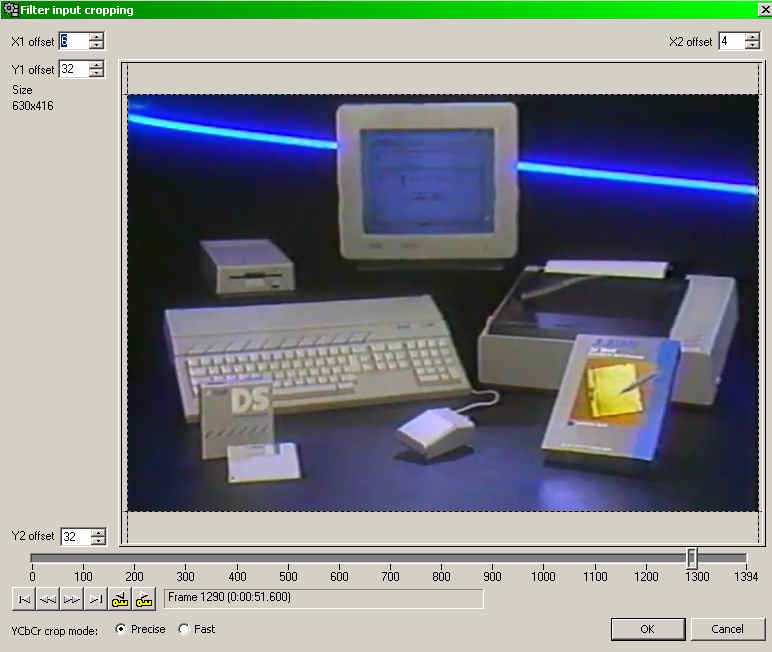
After setting resize need to crop - remove black parts left and right, top, bottom. + because this will be 320x158 need to cut little more at top and bottom.
Important to get correct AR - we don't want too much streched picture.
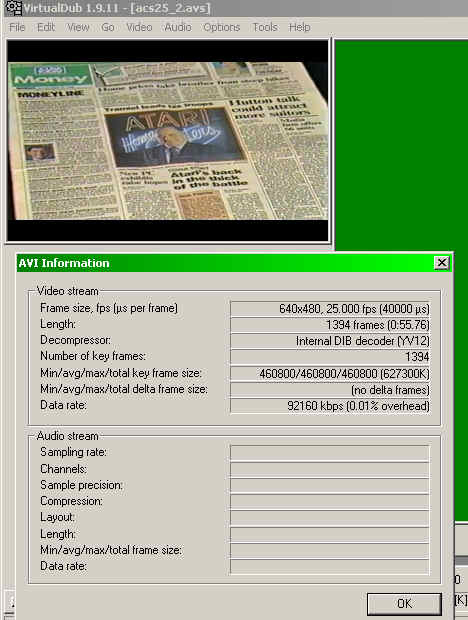
This is how output image will look. + File information - as you may see, it is exactly 25 fps.
When all is set, we need only to extract image sequence. Only if want 12.5 fps playback need to go in framerate setting:
Same thing (12.5 fps) we could get by replacing num=25000 with num=12500 in script above.
Because generating new frames is complex, it will work little slower, may take 5-10 min for 1 min video. I don't see any, even smaller errors in this conversion.
And MVTools may be good for many other videos. People using it for get 48-60 fps from 24-25 fps sources. I did Hobbit trailer 24 to 50 fps, and looks pretty well.
Where to get source for above ? DL clip . You will need flv plugin for Virtual Dub too. Best is to make intermediate file in AVI format before framerate conversion, with noise filtering, cropping etc.
If you managed it, you just made better conversion than usual ones, and my first conversion of this Atari video (20% slower than org.) .
PP Dec. 2012 .
Send mail with
suggestions,
questions, critic etc. to site maintainer: Before it enter name
of animal on small picture:
|
Menu Properties Quick Reference