|
We are in years when usage of regular floppy disk and drives becomes more and more problematic and unreliable. Nobody manufactures anymore them, so all what can get is used, old one, what will not last for long. So, diverse HW floppy emulators appeared on market in last decade. In Atari ST waters most popular are HxC and Gotek. They work with floppy images, stored on Flash card, Pen drive. But we can store floppy images on mass storage attached to Atari ST. And use them as logical drive A: or B: . I made some 10 years ago program called Floppy Image Runner But it needs little more RAM to work with usual images, since they are kept in RAM, so min 2MB for usual 720-800 KB images. Virtual Floppy is based on accessing images from mass storage (hard disk, flash card) during work, so no extra RAM needed, especially because code for access is in TOS ROM. That means that SW what needs 512 KB to run from floppy will work with same RAM in machine with hard disk via Virtual Floppy feature. Comparing Virtual Floppy with HW emulators like HxC : this is not exactly the same, despite using floppy images. Advantage of HxC is that it works for Atari floppy controller chip (FDC), to say so - it gives signal like what real floppy drive gives. So, SW what accessing floppy via direct FDC access will work with HxC well - well, unless there is some stronger copy protection. Then it will not work, not even if using STX (Pasti) format. In short, HxC can replace real floppy drive and disks in many cases, and will work fine with most of games (cracks), but don't expect some good copy protection support (would be better to say some anti-copy protection :-) ). Virtual floppy will not work with SW where is direct FDC access, because it uses not FDC at all, of course. Most of Atari SW is not with direct FDC access, not even most of games, so success rate is good. But it means not that such SW can not work. I already adapted some games with direct FDC for Virtual Floppy, and there will be much more, since just need to make usually smaller changes in existing hard disk adaptations. Example: Space Ace RIA RIA means RAW image access, and is part of Virtual Floppy, as simple and fast way to access floppy image on hard disk. It is in ROM, so no extra RAM usage, and Space Ace RIA works with only 512 KB RAM well. Large images, with content of many floppies: this can make usage much easier and comfortable. For instance Space Ace image hold content of all 4 floppies, and user don't need to bother with disk/image swappings. And is possible to put content of much more flopies in single image file. Summary: Virtual Floppy works not with some SW (direct FDC access) without some modifications in it. Advantages are: much faster work, possibility to work with large images holding content of multiple floppies. SW with direct FDC access can be fixed for Virtual Floppy, and I already did it for about dozen of good games. Image types (categories) which are supported: 1. Regular *.ST floppy images with FAT12 filesystem - most is such. 2. *.ST images where on side A is FAT12 filesystem, while on side B is custom data, accessed via XBIOS 8 TOS call. That can have extension ST2 . Examples: Alpha Waves complete floppy, where on side B intro music is placed. Side A holds game, and whole thing is done in purpose that people with SS floppy drive can play game without music, those with DS drive and 1 MB will have music too. Black Cauldron - 2 side release. There is more ... 3. Large images. Extension can be STL . Can hold content of several floppies. Advantage is that no need for to be DJ - swapping disks/images during play, or running some utilities. Filesystem is FAT12 up 4 MB, over it FAT16 . Examples: Elvira 2, Kristal ... 4. SW with direct floppy access and corrections. Extension can be STR . It accessing image data with low level ROM code (RIA - raw image access), so no RAM taken by hard disk driver code. Benefit is that can play 512 KB games from hard disk on machines with only 512 KB RAM. And fast work, no need to swap images - yes, images can be large here too. Existing hard disk adaptations can be fixed for this, and I already did about 20 games. Usage manual: Principle of work is based on container files, may call it even session files, which can hold up to 18 image files - 9-9 for A: and for B: . During usage can change active image for A: and for B: in Desktop by pressing Esc (as refresh key) and immediately after it 1-9 on Numpad - what will make that image as active for that drive. This can be especially useful when working with some own floppy images, and want to check their content, to transfer some files to/from hard disk parititons, or to/from some other image. 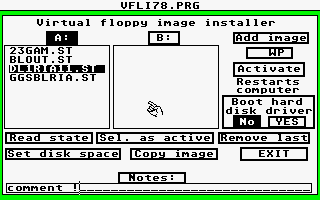 First step is to run program VFLI, and create container file. Type in size in MB - min is 1 MB, max is size of partition, so can go up to 1GB, but hardly will need more than some 50 MB, I guess. Hint: if want to deal with 15 800 KB images, will need about 13 MB size. Program will create file, what takes some seconds (depending on size), and then will check for fragmentation. Yes, condition for good and fast work is defragmented file. If it is fragmented, don't use file, and don't install images in it. Just create new container file, and will get sooner or later not fragmented one ('Success' will be written) . Later can delete fragmented files from disk. Of course, much better is to ensure that partition where container files go is defragmented. And if it is empty, it is for sure that. Step 2 is to mount image files into container - in first dialog. Select drive A: or B: , may set that it will be write protected (button WP) , and may put some note(s) for image (need to edit it before clicking Add Image). With Add Image it will be mounted - if there is enough space for. When added all what wanted need yet to set will boot or not hard disk driver . For case when want to exchange, transfer some data, files will need hard disk driver boot. For gaming will not need in most cases. Or for simulating work with floppies. Then click on 'Activate' - that will perform warm reset, after which Virtual Floppy mode is active, and no floppy access is performed (if there is such at all attached to computer) . Boot code in floppy bootsector will be exexuted, aswell AUTO run . Or it will just go to Desktop, and of course Desktop.inf on A: will be used - it there is such on image for A: . Changing active image for A: and B: as said, may with Esc. + Numpad Number key in Desktop, opened drive . That will not work well with non-regular floppy images (where no visible files). But you can change active one with VFLI program - there is button for that. And may create new container files, with other images, and set some already created container with mounted images as active - Set disk space, Select container file . When return to main dialog may look content with Read state, and may set active images for A: and B: . Button Copy Image is for copying image from container to hard disk - that may be useful when there are changes done in it, during Virtual Floppy sessions. Activating Virtual Floppy mode right after Power On: When Atari logo and input countdown appears, by pressing key v Virtual Floppy mode activates - but only if there is container activated already. Of course, last activated one will be it. Deactivating Virtual Floppy mode: cold reset will deactivate - that's Alt + Ctrl + Shift + Delete press. What works not from every SW, of course. Then may press reset button, and shortly after it combination above. Cold reset will happen if SW what is executed destroys TOS system variables - mostly games. So, after playing Giana reset will be cold, and machine will start in usual mode. Demo videos: YT demonstration 1 YT demonstration 2 YT demonstration 3 In latest is most about usage self, first 2 is focused on capabilities. PP, May 2019. |