>> Linux version
Program is intended for diverse data transfer and storage/backup operations with mass storage medias (drive, disk, flash card). Basic option is making of image file, and reverse operation - writing image file to media. Such image files are useful as backups, as images suitable for diverse emulators. Program works with hard drive category of medias - there belong: IDE hard disks, PEN drives, diverse FLASH storage cards as Compact Flash & SD cards - they attach usually via some USB card reader to PC. File transfer may happen directly from/to attached disk/media or from/to image file.
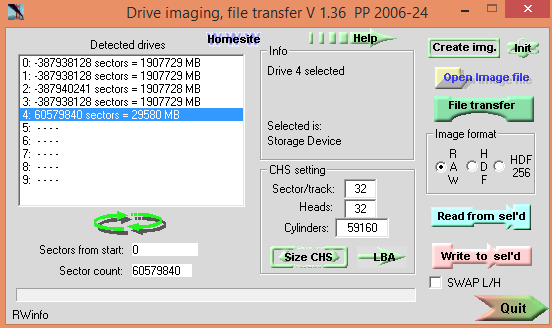
Selection of drive is by simple click on it's line in list window left. Then program attempts to detect used filesystem on that media . First ones are internal hard disks with 'DOS mbr' filesystem - so better don't write to them! GemDos is used by Atari ST and compatibles. PLUSIDEDOS is used by Spectrum +3e and some other clones. 'Charea DoS' is mine system, with 36 areas by begin letter A-Z, 0-9.
Refresh button is for forcing detection of all drives again - in case you connected/disconnected something. Under it you may set offset from start of disks and count of sectors if want to read/write only segment of drive.
Because it is not possible to detect correct CHS parameters via USB reader, there is possibility to enter them manually. Program usually offers usable values for Compact Flash cards. With click on 'Size CHS' user may change detected drive's size, by need. That size remains until next drive selection. 'LBA' is required only for disk Init, see below.
With click on 'Open image file' you may select image file instead drive. You may then perform even conversion RAW-HDF or HDF-RAW. Just click after selecting image file on 'Read from sel'd', and program will convert.
If 'Swap L/H' is checked program will swap Low/High bytes by reading from drive to image file or by writing from image file to drive. It is for Atari ST disks used with IDE interface, where MSB/LSB order is reversed in compare to PC. When such drive is selected 'GemDos SW' will appear as filesystem in 'Info' block. Converting image file to reversed L/H ordered is easy: open image file, check 'Swap L/H' and click 'Read from sel'd' . Give filename and save it...
Program gets CHS parameters from hdf files, but for RAW it is not possible (except when Charea DoS FS is on, see below - Guess geo.) , so enter them manually by need - in case of (older) image files for usage with CHS ROMs.
Program will ask for extra confirmation in case of attempting write to drive over 2 GB - to prevent accidental write to PC hard disks, what will result in destroying partition records and datas on them.
Limitations: works only in Windows XP and newer versions. Must have admin rights to read/write on drives.
Speed: From version 1.32 speed is significantly improved. It depends much from used media and connection. I get over 10MB/sec with SanDisk Ultra II 2GB CF card by read, but only when connect it to IDE controller of MB (via CF-IDE adapter). With cheap USB card reader speed is abut 2.5MB/sec for same card. Write to FLASH cards is usually slower 2-3 times thean read.
Important for users of Windows 7 and later (up to 10): those Windows versions will not allow proper write of image files to Flash cards if they contain some DOS or Windows partitions, and they are mounted when attached to PC. For now I can offer only simple solution to workaround that problem, until find a way to do it in this SW (if it is possible at all ?). Whole trick is to destroy MBR (Master Boot Record) on Flash card, then it will be detected as unpartitioned, uninitialized. Destroying of partitions before writing image to card is no problem, because image writing destroys it anyway. So, you need to write supplied short file ZEROS.IMG to card with this SW. Of course to begin of card, so leave Sectors from start setting at value 0. After that short write disconnect card reader for few seconds and attach it again. Should no mount any partitions. Then can write image file on it properly. When completed write may test are TOS/DOS compatible partitions (in case that wrote such image) accessible in Windows will need to remove and reinsert card again.
Atari ST GemDos, DOS16 & BigDOS
file transfer & partition extract
When GemDos or DOS MBR (partition
table) with FAT16, BigDOS
partitions (or just single
partition without MBR)
is detected, following dialog will open after clicking on 'File transfer' :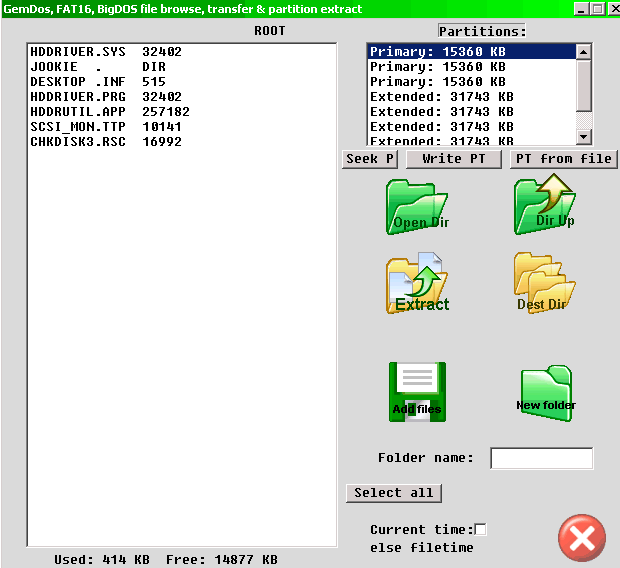
It works with GemDos AHDI 3.0 spec partitioned hard disks, medias or image files of them (img, raw) . Plus works with DOS FAT16 and BigDos(x) partitions - primary and in Extended and EXTNDx partitions.
Limitation: there is no more 2GB limit.
Select partition in right box, and program will list root directory of it in left box.
May select multiple files, directories at once. With 'Extract' all it (with subdirectories and their content) will be copied in current directory on PC, which may be selected with 'Dest Dir' button.
Buttons 'Dir Up' and 'Open Dir' are for navigation in GemDos partition's directories.
Subdir can be opened with double-click on it's name too.
'Add files' : It is of course for copiing files from PC to attached disk/media or to image file. May add multiple files at once, but not subdirectories with their content. Below is selectable whether timestamp of added files will be current time or origin file's time.
'New folder.' : creates subDir by name given in editbox below - in current ST dir. Use capital letters.
Sunken button 'Partitions:' is for extracting image file of only selected partition. From drive or image file. In case of swapped L/H it will be saved in normal order, so may access partition with common tools. It also sets 'Sectors from start' and 'Sector count' to position of selected partition in main window (just close file selector without save). So advanced user may insert partiton with new content in disk or image file. It is dangerous operation, so do it only if know what are you doing.
It works now with AHDI (GemDos) spec. disks (or image files) with reversed (swapped) (IDE interface) byte order too. Program will autodetect byte order ('GemDos SW' will appear for reversed ones), and will do all necessary swappings.
New option at ver. 1.28 : Seeking partitions. If partition table is damaged from some reason program can seek FAT16 partitions. List of partitions is empty then, or some partitions missing. Click on 'Seek P' button, and list of partitions will appear left, instantly - in case that they are not damaged/overwritten.
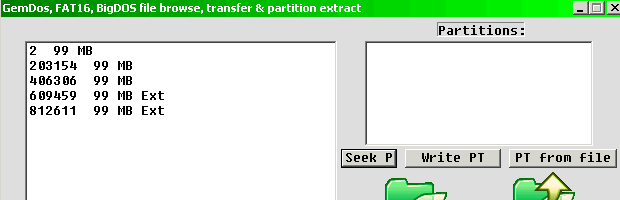
First value is sector offset from start. Then is size in MB and 'Ext' if it is extended partition. With click on 'Write PT' (Write partition table) it will be written to image in GemDOS format.
Before it, program will save current partition table (MBR sector) - give some memorable name to file.
'PT from file' will write partition table in image or drive from selected file. So, may restore original or make some experiments.
Seeking partitions combined with partition extract offers some new possibilities - as making custom order from selected partitions. User needs to extract partitions and then just make one combined file from them with copy command. For now, only 4 primary partitions may be combined so. After it seeking will create partition table...
ZX
file transfer:
User may extract ZX
files from drives or image files (raw or hdf
format). After selecting drive from list or file with 'Open image file' click on
'File transfer' - it
is designed for Charea DoS system, used by hard
disk and CF ROMs (zxcflba.rom, zx8bide.rom & zxide.rom) on this site.
If you get mess instead lists probably CHS is incorrect. For LBA it is
'standard' 32 Sector/track and 8 Heads. Clicking on 'Guess geo.' may detect and
set correct drive geometry.Before
clicking on 'File transfer' button be sure that Image format is correct
set. Program usually automatically sets it, but sometimes user will
need to manually set it. For 8-bit simple IF drives or images must set
HDF 256.
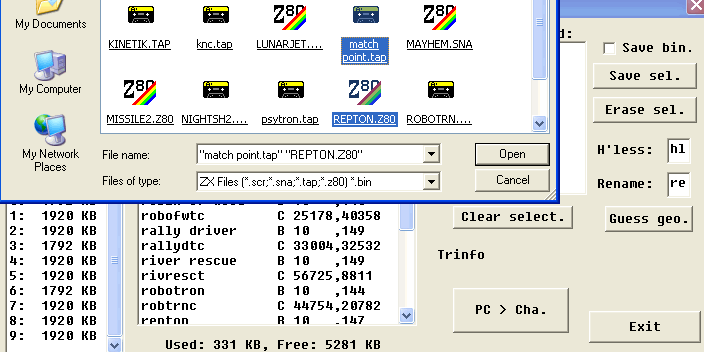
ZX > PC:
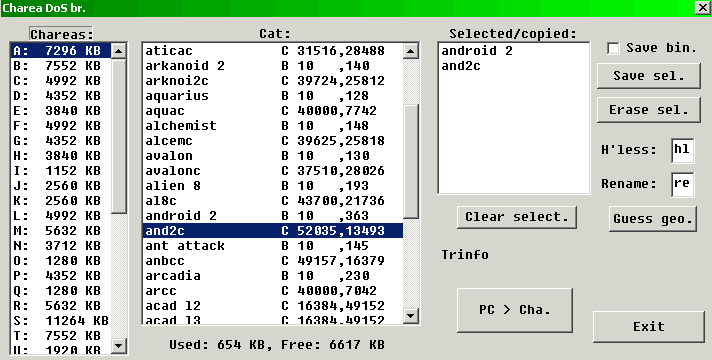
At left select Charea, then clicking on files in middle box selects them for transfer - they appear in right box. With 'Save sel.' it will be transferred to PC.
Resulting file may be TAP file , Z80 snapshot. If length ( last column at Cat: ) is 49152 it will be Z80. It is possible to save ZX files directly, without header - just check 'Save bin.', and all will be saved so, with extensions bin. You may select max 32 files at once. However, it is not wise to select lot of files for TAP at once - because all will go in single TAP file. Best way is as it is shown on pic. above - first select BASIC loader and then CODE (after it). Most of programs is recorded so. 'Erase sel.' is for erasing ZX files. It works little unusual - may erasing only last file in charea. But you may select again multiple files, just select them in order from last to up - may select from different chareas at once.
With click on 'Chareas' program will set segment for just currently selected charea - to make easy save/write of individual chareas of drives.
PC > ZX:
Click on 'PC > Cha.' button, and may select multiple files with Win. fileselector:
Supported filetypes are: SCR - ZX screen, exactly 6912 bytes long. SNA - old snapshot files. Z80 snapshot - V 1.45, V 2.01 & V 3.0 , only for 48K, for now. Plus TAP files and BINary files - bin ones will be copied directly as CODE files, with start address 25000, max len. 48KB. Transfer mode depends on file extension. Because authors of software, and especially 'authors' of TAP files had pretty limited naming imagination, and to prevent to see too often message like:
 I implemented some autonaming system. In case
of
duplicate name in TAP file, prog. will rename it to re.xxx.PCfilename .
're' may be changed in editbox 'Rename:'. xxx is auto-counter
in range 1 to 255. If begin character is illegal (not A-z, 0-9)
it will be changed to 9. Codes above 127 and below 32 in filenames will
be changed to '?'- to make edit
easier.
I implemented some autonaming system. In case
of
duplicate name in TAP file, prog. will rename it to re.xxx.PCfilename .
're' may be changed in editbox 'Rename:'. xxx is auto-counter
in range 1 to 255. If begin character is illegal (not A-z, 0-9)
it will be changed to 9. Codes above 127 and below 32 in filenames will
be changed to '?'- to make edit
easier.After getting such renamed files it is good to correct BASIC loader, and save datas with some meaningful names: Corrections will be needed for commands like: LOAD "" - it is not allowed by disk systems, so enter in brackets filename. Mine ROM also not accepts LOAD "pic" SCREEN$ - change it to LOAD "pic" CODE [16384] . Luckily, ZX filesystem is case sensitive, so you may play with RePTON, rEpToN etc... .
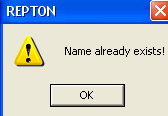
In some cases transferred snapshot will not work - it is because of limited hardware. Stack may be overloaded. In such case help is to make another snapshot file on PC (looking for another on WEB). Rule is: make snapshot when game is paused. In case of 'Name already exists' by snapshots just simple rename PC file...
Some TAP files have headerless (and nameless) parts - such blocks will be transferred to files with names: hl.1.PCfilename, hl.2.PCfilename etc. Of course, here is also possible to change prefix 'hl' to different - editbox 'H'less:'. User must find way how to make later load of those files normally - some machine code knowledge is necessary.
For experts: If I reg points to ROM, it must be #39 for IM 2 mode, because ROM is full with code.
Image creation:
In
main window, at top right is button 'Create img' . It will create empty image file in
format according to settings in box 'Image format', with geometry by
settings in box 'CHS setting'.
Recomended is usage of HDF format - it holds all necessary parameters. For 8-bit simple IF HDF 256 format is required.
Recomended is usage of HDF format - it holds all necessary parameters. For 8-bit simple IF HDF 256 format is required.
Initialization
of ZX disk or image file:
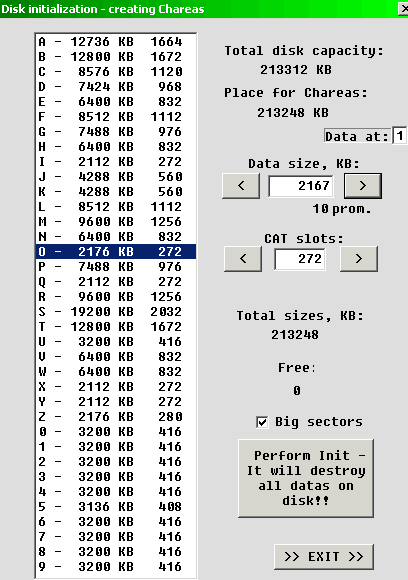
Before usage, disk (media) must be initialized, what means creating of filesystem. It is something like partitioning on PC.
Select drive or Open image file. Set geometry by need (it can't be autodetected in some cases). For zxcflba.rom (CF interface) click button 'LBA' - it will set correct parameters for init (32 sec/tr & 8 heads). Check is Image format correct (for 8-bit simple IF it must be HDF 256). Then click on 'Init' at top right.
Program divides space by criteria how much begin letter is common. So, much more space for S than for Q.
In listbox is begin letter, then total capacity of it's charea and number of CAT slots - so much files can be stored there. By clicking on charea in listbox it's parameters will appear in setboxes right. There may adjust size and slot count. Lower will see total size of all chareas. Most important is to watch 'Free:' indicator. If it go in negative, you must decrease size of some charea(s). Otherwise last charea(s) will be outside of disks capacity.
Small setbox 'Data at:' is for setting start cylinder of first charea. It is standardly 1, but in some cases may be bigger, up to 9. Can't be 0 (at start is Master CAT). After writing in value click on 'Data at:' to enter it. And may need to decrease some sizes after...
Old filesystem has some limitations: max size of charea is 32MB by CF and 16-bit IF, and 16MB by 8-bit simple IF.
Count of CAT slots is limited to 4064/2032. Still, there is lot of space: in 16MB can fit over 330 snapshot. Max size of drive/media what can be fully used is about 1.1 GB.
New filesystem with big sectors has max charea sizes of 64MB for all types of interfaces. Check 'Big Sectors' for such ROMs before init. It has sense only for larger drives/medias - over 500MB. Fillable media size is then 2.2 GB (4.4 GB for 8-bit IF).
With click on button with long text, and confirmation, disk/image will be initalized and ready for usage. You may imediately check it by entering 'File transfer' .
Download
July 2006 - Febr. 2024. P. Putnik
Send
mail with suggestions,
questions, critic etc. to site maintainer: Before it enter name
of animal on small picture (antispam):
|
hcnt: 148287