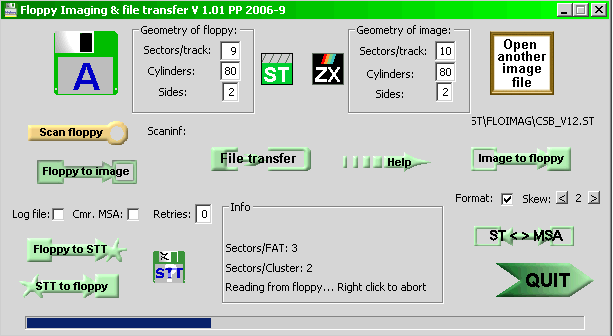
Purpose of this program is making image files of floppies - for usage with emulators on PC, data preservation.Then, file transfers & writing image files onto floppies... It works under Windows XP, Win2K, Vista, Win 7. For instance it can fast make images of 800KB, 1600KB floppies. Uses Simon Owen 's fdrawcmd - low level floppy driver, which overrides limitations of standard Windows floppy drivers.
So, first thing is that you install fdrawcmd on your Windows. It is for built-in floppy drives, not for USB externals. Then download Floppy Image and may start it:
(If you have Win98 or 95 you may still use this prg. - without floppy drive access, for extracting files from images, conversion etc.)
I strongly recommend for beginners that read carefully this usage guide. In case of problems mail me (link at bottom). That's where you may expect fastest answer. Considering popular Atari forums: I saw lot of misguiding answers in them. Situation is now better, and of course people like to hear different opinions. Problem is when people writes things which they even did not try (properly) - like about WFDCopy.
New in version 1.02 : Improved STT write support - possible to write floppies with mixed 512 byte and 1K sectors. Still, not possible to write tight packed ones with 6KB data per track. What works is Alien World, Action Force ... (will be more as currently doing conversions). For thight packed ones you need HxC .
New in version 1.0 : Separated info boxes for floppy and image file, easier usage, better overview. Option to save compressed MSA images. View option in ST file transfer.
It is about 5 years since first version is released. Most problems were reported about non working floppies on real Atari, which were written with program (from image files). Myself had it many times. Reason is usually low quality or bad condition of floppies. PC and Atari have different floppy controller chips, so high quality of recording is a must - use good floppies. As I see age is not problem in most cases, some old ones are even better than average news. Second reason may be disalign of head settings between PC and Atari floppy drive. It is not for average user to set floppy heads, but replacing drive with other may help.
Now, let see the usage:
Making image file of floppy: insert floppy in drive and click on icon A at top left. It will read parameters of disk, and display them. Right by box with geometry of floppy small icon with description of floppy type will appear. ST means Atari ST FAT12 type. ZX is my special Sinclair ZX Spectrum floppy format. Sam Coupe is it's regular format. If exclamation mark in red appears: floppy parameters are invalid, unknown, unsupported or unreadable. Then you my modify CHS parameters by need and by hand - if you know what are you doing.
To create image file click on Floppy to Image, choose ST, MSA or DSK, give filename and prg. will save it to standard ST(=DSK) or MSA file, and generate log file (if checked) with same name, but extension 'log' - with list of bad sectors by read. It will work fine with non-protected disks. If 'Cmr. MSA' is checked MSA files will be saved RLE compressed - it stays for conversion ST>MSA too.
You may write image files (ST, DSK or MSA) to floppies, with or without format - if format is checked it will work slower, but may be necessary if target disk is formatted with different parameters prior. First Open image file. After it you may correct parameters if they aren't OK ( for experts only ! ) - with MSA images it should be never necessary (case of non-standard boot sector ). Finally click 'Image to floppy' . If getting messages about RNF abort with right mouse button and check on format. If it helps not, floppy is likely in bad shape - try with other.
ST < > MSA is for conversion from ST to MSA or vice-versa of opened image file (with Open Image file but.) . It will save converted image file in same DIR .
MSA output will be compressed if 'Cmr. MSA' is checked.
By floppies in bad condition it is worth to set Retries to value 2-5. Don't expect miracles of it. My experience is that with old floppies is good to repeat reading of whole disk 4-5 times, and it will have at end less bad sectors.
Button Floppy to STT saves images in STT format, which is less known. It is Steem specific, and not fully developed. I choosed it, because may be expanded, and is supported at least somehow. For now, it can only save floppies with non-standard sector numbers on tracks. Chaos Strikes Back partially works - it can be started, but no position save (no weak sector flags in current STT spec.)
Button STT to floppy writes STT images to floppies. Here is working example: Vir*usGame.zip . After writing it to floppy, you may see (scan) how protection is made. Note: it will not work in Steem, because of incomplete emulation, but works on real ST(E) machines. Triple format (Amiga, Atari ST, PC) floppy: Public Domain Cover disk 4 . There are some inaccessible areas on PC, ST - where Amiga part is. Of course it is not imaged correct, but this is not for Amiga.
Small floppy shape button with text STT and question mark is for getting track and sector layout of STT files. Select STT file, and program will generate TXT file with same name. There is list of sectors by tracks, after x is sectorsize code: 2 is regular 512 bytes, 3 is 1024 bytes etc...
If boot sector is unreadable, you must set parameters - it may require couple tries (and later need to hexedit image file).
Scan floppy is for determining parameters if they are non-standard, or boot sector is damaged. It prints out sector numbers in tracks, hexadecimal. Range of scan will be by values in Tracks and Sides edit boxes. Meanings: T4 = Track 4 S0 = side 0 , then comes list of sectors, in hex. First one is always first after index. It is not 1 on pic above because of skew.
Usual reason of getting message about 'Boot sector read error' is that floppy is formatted with Fast Copy Pro , fast option set, on Atari. Such floppies can not be read on PC because of different floppy controller. Not even in DOS. Solution is to copy such floppy on another one with Atari - but with different copy program than Fast Copy Pro.
Note: write or format of 11 sector/track will not produce usable floppy - reason is inability of PC's floppy controller to do it.
File transfer: program has option for file transfer (extracting, adding, viewing) from/to floppies or image files.
Supported formats are : FAT12 - used by MS DOS and Atari ST, SAM Coupe and ZX special PP format. Program will autodetect format by opening floppy/image.
From version 1.01 there is option to manually change detected format, shown by small icon near to geometry. Clicking on that icon will cycle between 3 supported formats : ST (what is FAT12 actually), SAM Coupe and ZX . This is for not likely case that autodetect fails.
File transfer will work with last selected item - floppy or image file. If floppy icon is 'opened' then it was last selected.
Depending on detected and shown format different dialogs will open by clicking "File transfer" :
Browsing,
extracting, view & adding files from/to ST floppies:
You may extract & add files direct from/to floppies or from/to image files. Click on File transfer button, and will get following dialog:
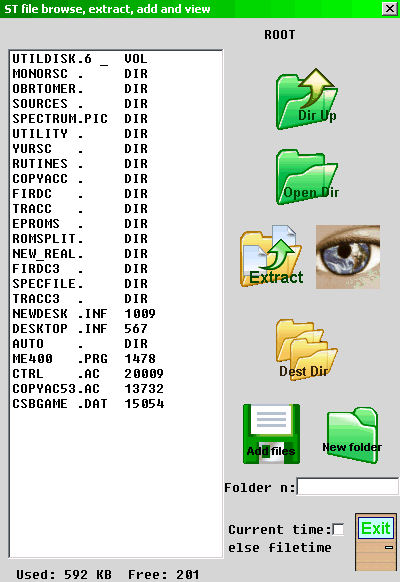
May select multiple files at once. It will initially save all in directory EXTRACT, what may be changed with button Dest Dir. But take care that program overwrites files without warning. Opening subdirectory is possible via double-click on it, or with button Open DIR . Button DIR Up is for back one subdir. level (to parent dir.). If DIR is selected program will save all files from all subdirectories recursively.
When click Add files you may select multiple files with Windows fileselector. Create New folder by need on floppy: under button enter directory name as standard DOS 8.3 filename .Checkbox Current time (else filetime) is for both extract and add files, and determines timestamp on copies of files. Adding files is possible to floppies and ST(DSK) image files.
For making things easier here is small archive with 2 empty floppy images: Empty Floppies . One is standard PC 720KB and other is 800KB, much used on ST. If you want to transfer (run) some files which you have on PC - to ST, just add them to empty image and then write it to floppy. With 720KB one you have more ways - write it to floppy, and then can add/delete to it with Windows Explorer or Total Commander.
View ST files is new option at V 1.0 . It is little help for fast checking of file's content. Principle of work is: extracting file in special temp DIR, named VIEW, and then opening it with default Win. program for that file extension (type). So, it will extract TXT files, and open with default app. for them - usually Notepad.
If ST file has extension DOC or INF it will be renamed and extracted as TXT file and opened as such.
Viewing common Atari picture formats: if some viewer for them is installed in Windows you will see them.
For instance with Atari Picture Viewer installed. I did so far only converter of Photochrome PCS images to BMP ones, so they will be opened with regular Win pic viewer.
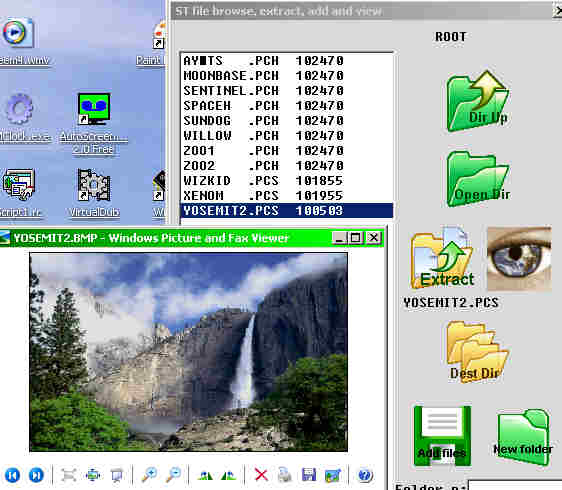
Viewing PCS image as BMP.
Of course, you may copy then converted BMP file somewhere from dir VIEW.
Note: for correct extraction and view, subdirs EXTRACT and VIEW must exist in Floppy Imager's folder !
You may extract & add files direct from/to floppies or from/to image files. Click on File transfer button, and will get following dialog:
May select multiple files at once. It will initially save all in directory EXTRACT, what may be changed with button Dest Dir. But take care that program overwrites files without warning. Opening subdirectory is possible via double-click on it, or with button Open DIR . Button DIR Up is for back one subdir. level (to parent dir.). If DIR is selected program will save all files from all subdirectories recursively.
When click Add files you may select multiple files with Windows fileselector. Create New folder by need on floppy: under button enter directory name as standard DOS 8.3 filename .Checkbox Current time (else filetime) is for both extract and add files, and determines timestamp on copies of files. Adding files is possible to floppies and ST(DSK) image files.
For making things easier here is small archive with 2 empty floppy images: Empty Floppies . One is standard PC 720KB and other is 800KB, much used on ST. If you want to transfer (run) some files which you have on PC - to ST, just add them to empty image and then write it to floppy. With 720KB one you have more ways - write it to floppy, and then can add/delete to it with Windows Explorer or Total Commander.
View ST files is new option at V 1.0 . It is little help for fast checking of file's content. Principle of work is: extracting file in special temp DIR, named VIEW, and then opening it with default Win. program for that file extension (type). So, it will extract TXT files, and open with default app. for them - usually Notepad.
If ST file has extension DOC or INF it will be renamed and extracted as TXT file and opened as such.
Viewing common Atari picture formats: if some viewer for them is installed in Windows you will see them.
For instance with Atari Picture Viewer installed. I did so far only converter of Photochrome PCS images to BMP ones, so they will be opened with regular Win pic viewer.
Viewing PCS image as BMP.
Of course, you may copy then converted BMP file somewhere from dir VIEW.
Note: for correct extraction and view, subdirs EXTRACT and VIEW must exist in Floppy Imager's folder !
ZX Spectrum floppy PP format file extraction and write:
If such format (for floppy interface on this site) is detected following dialog will open when click on 'Extract files' :
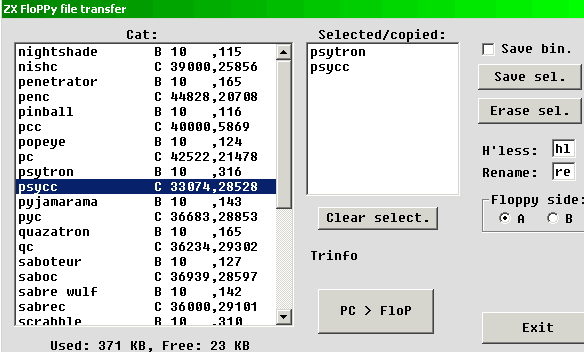
Select side A or B - then clicking on files in left box selects them for transfer - they appear in right box. With 'Save sel.' it will be transferred to PC.
Resulting file may be TAP file , Z80 snapshot. If length ( last column at Cat: ) is 49152 it will be Z80. It is possible to save ZX files directly, without header - just check 'Save bin.', and all will be saved so, with extensions bin. You may select max 32 files at once. However, it is not wise to select lot of files for TAP at once - because all will go in single TAP file. Best way is as it is shown on pic. above - first select BASIC loader and then CODE (after it). Most of programs is recorded so. 'Erase sel.' is for erasing ZX files. It works little unusual - may erasing only last file in charea. But you may select again multiple files, just select them in order from last to up .
PC > ZX:
Click on 'PC > FloP' button, and may select multiple files with Win. fileselector:
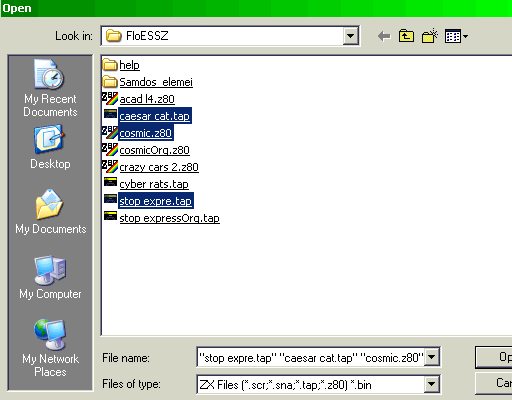
Supported filetypes are: SCR - ZX screen, exactly 6912 bytes long. SNA - old snapshot files. Z80 snapshot - V 1.45, V 2.01 & V 3.0 , only for 48K, for now. Plus TAP files and BINary files - bin ones will be copied directly as CODE files, with start address 25000, max len. 48KB. Transfer mode depends on file extension. Because authors of software, and especially 'authors' of TAP files had pretty limited naming imagination, and to prevent to see too often message like:
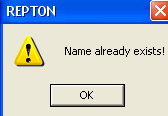 I implemented some autonaming system. In case
of
duplicate name in TAP file, prog. will rename it to re.xxx.ZXfilename .
're' may be changed in editbox 'Rename:'. xxx is auto-counter
in range 1 to 255. If begin character is illegal (not A-z, 0-9)
it will be changed to 9. Codes above 127 and below 32 in filenames will
be changed to '?'- to make edit
easier.
I implemented some autonaming system. In case
of
duplicate name in TAP file, prog. will rename it to re.xxx.ZXfilename .
're' may be changed in editbox 'Rename:'. xxx is auto-counter
in range 1 to 255. If begin character is illegal (not A-z, 0-9)
it will be changed to 9. Codes above 127 and below 32 in filenames will
be changed to '?'- to make edit
easier.After getting such renamed files it is good to correct BASIC loader, and save datas with some meaningful names: Corrections will be needed for commands like: LOAD "" - it is not allowed by disk systems, so enter in brackets filename. Mine ROM also not accepts LOAD "pic" SCREEN$ - change it to LOAD "pic" CODE [16384] . Luckily, ZX filesystem is case sensitive, so you may play with RePTON, rEpToN etc... .
In some cases transferred snapshot will not work - it is because of limited hardware. Stack may be overloaded. In such case help is to make another snapshot file on PC (looking for another on WEB). Rule is: make snapshot when game is paused. In case of 'Name already exists' by snapshots just simple rename PC file...
Some TAP files have headerless (and nameless) parts - such blocks will be transferred to files with names: hl.1.PCfilename, hl.2.PCfilename etc. Of course, here is also possible to change prefix 'hl' to different - editbox 'H'less:'. User must find way how to make later load of those files normally - some machine code knowledge is necessary.
For experts: If I reg points to ROM, it must be #39 for IM 2 mode, because ROM is full with code.
Sam Coupe floppy file extraction:
From V 0.85 Sam Coupe floppy support is added.

Here may select multiple files
too.
From floppy
or DSK image files.
Important! Read this for undertanding reasons, problems: The Floppy Mystery (Atari related)
How to determine is floppy copy-protected?
It is not simple, since there is many copy protection system. Checking image with emulator by dilemma is necessary. In any case, if it is user's floppy, filled at home/office, it is not protected (unless made by some protection expert).
Original disks are copy-protected very often. Some systems:
There are tracks over cylinder 79, but it is not visible from BPB (parameters). Scan of tracks 80-82 may find some data there, but it depends from floppy drive - some can't go over 80, 81.
Weak sectors - usually on first track, CRC error will appear by imaging. Pasti is only way currently for making usable images of such floppies - on Atari machines. But it can be used only in Steem and Saint. No write support, not even with extra HW as CatWeasel.
Non-standard sector numbers in tracks (not in range 1-9/10/18/20). With scan it's nice visible. Plus may have fake track, side, sect. IDs. It can not be imaged with standard formats like ST or MSA or IMG. Try STT or Pasti. Or buy KryoFlux.
FastCopy Pro problem: if you formatted floppies with FastCopy Pro, with 10 /sec/track, and option 'Fast format' on (under more settings), it will not read some sectors on PC. Pattern of RNF sectors is: 1,9,7,5,3,1 etc (those are first sectors on tracks, due to skew). Reason is too short track lead. Such floppies are well readable on Atari machines, so if want to make their image do it on Atari ST or copy them on Atari to floppies with regular format (turn off 'fast format' if want still to use FC Pro).
Related:
Most used floppy formats on Atari ST:
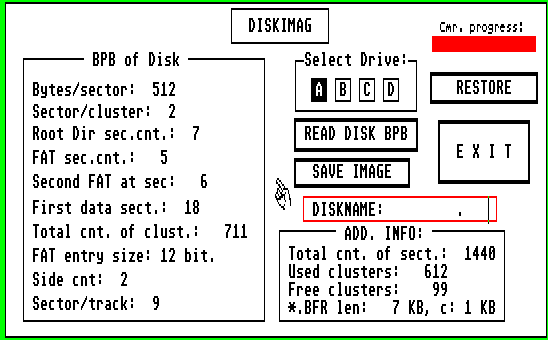 So looks floppy formatted with ROMs built
in (Desktop) formatter.
So looks floppy formatted with ROMs built
in (Desktop) formatter.Note that FAT has 5 sectors.
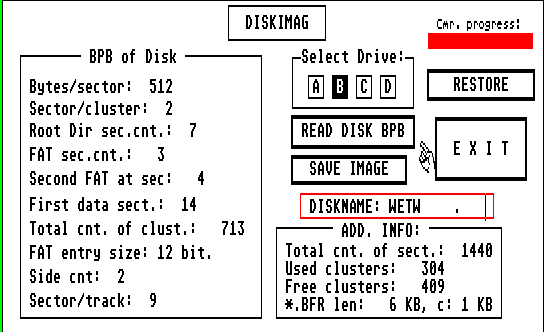 This is formatted on PC. 720K floppy.
Note that FAT has 3 sectors.
 This is probably most used on Atari.
By some formatters FAT length may be 5 sectors, but it is waste of space. 800K full size, reliable. Read may be slower if not formatted with skew.
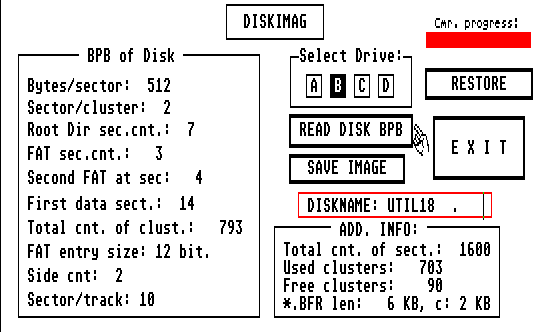
The program: DISKIMAG . It images not whole disks, just system area. Therefore file extension BFR - Boot, Fat, Root dir. May rename disks too.
Floppy formatting program for Atari ST, with lot of settings, features. DOWNLOAD :
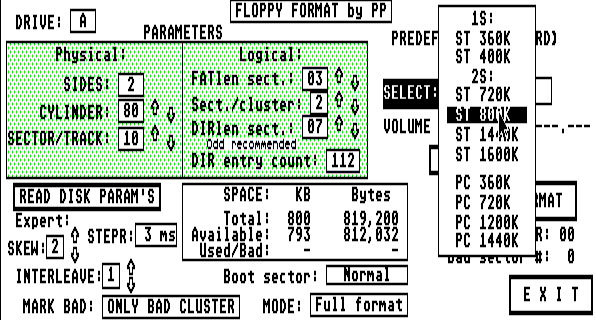
Instructions for usage
Here is new version of my old floppy imaging/copying program for Atari ST, named Trackcopy: TRACC .
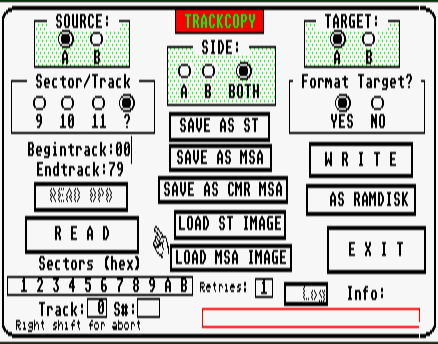
With ? selected it shows sector numbers on tracks and copies them. Not for copy-protected floppies. It requires 2MB RAM, but there is version for 1MB machines too .
Another copy program - with ramdisk, for filewise copy (Tracc is for copying whole disks) : COPYACC.ZIP


It works pretty fast due to cashing of system area. May look disk layout, 'Show for FILE' will show where file is placed on floppy. Not exactly year 2K compliant :-)
Modification of floppy drive for correct media change detection on Atari ST
Finally, short archive with 4 different empty floppy images (ZIPped) : 4 floppy images . PC 720KB, Atari 800KB, PC 1.44MB and Atari 1.44 MB.
P. Putnik, July 2006.- Aug. 2011.
Send mail with
suggestions,
questions, critic etc. to site maintainer: Before it enter name
of animal on small picture:
|
Menu Properties Quick Reference
hcnt: 352313