|
Integrated boot manager and other settings after reset When after reset the logo and TOS version appears user have about 9 secs to perform some settings by keypress: Newer boot settings v. logo in color and mono modes:   P - set PAL mode - 50 Hz refresh rate of video N - set NTSC mode - 60 Hz V - activate Virtual Floppy mode immediately - will set last installed set as active I - invert (swap) black and white color - so will have black background T - show TV test pattern - good for checking/setting picture position, size, test proper contrast, brightness ... Exit test pic. with space . R - run integrated partitioner . 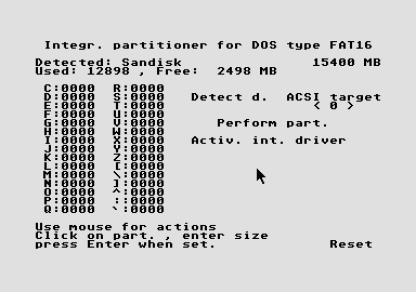 Usage of integrated partitioner is mostly self explaining . First to do is to click on Detect d. After clicking to partition's size zypher need to enter all 4 digits in row. Minimum partition size is 33 MB. But that's something not what should use with modern storage, when multi GB Flash cards cost about 10-20 bucks. And of course, no special max size limitation for first partition. Max partition size for all is 1023 MB. More details about countdown (normally starts at 9 sec., but can be less) : You can skip wait by pressing space key. 1-9 - selects special DIR for using it instead C: for: AUTO run PRG, for Desktop.inf and ACCessories. Then they will load from it, and Desktop.inf will be saved there. User needs to create DIR BT in root of C, and subdirectories 1-9 in it. No need to create subfolder AUTO in them, just copy desired PRG(s) for AUTO run in one of 'number' directory. Then, if pressing that number when logo appears, it will start in usual way, before Desktop. Copy ACCessories todesired 'number' directory too, and they will load when same # key is pressed after logo appear. If nothing is pressed it will work in usual way. Note: pressing any of above keys will start new waiting interval, so multiple settings can be done. It may be that pressing key G will do something too - only with 1.62 - then there is space for some shorter game in TOS ROM space. Holding down right shift key will prevent AUTO run . That needs to be done little later, after hard disk boot message. Note about appearing text messages during boot up: First TOS version will be shown, then message Floppy boot, Hard Disk boot, Integrated driver, AUTO run. It does not mean that it really happens - that depends from content of disk. Purpose is to show in which phase of boot up it is currently. So, floppy boot happens only when content of floppy bootsector is valid (checksum + code). Or there is some PRG in AUTO folder of boot device . Integrated hard disk driver There is hard disk driver inside improved TOS, for most popular adapter types used with Atari ST(E) computers. It must be specified for which adapter TOS autoboot must be assembled. For now, supported are: UltraSatan and ACSI adapters with ICD extension (over 1 GB accessible). 2 ACSI targets, so both UltraSatan SD card accessible. It is good for Satandisk too, which has ICD extension support too. Basic ACSI - for Mega STE internal adapter and diverse ACSI-SCSI adapters. Only 1 ACSI target supported. Capabilities, limitations of integrated hard disk driver: Max total 24 partitions (logical drives) mountable C: - Z: . Max capacity of 1 partition is 1 GB . Only DOS or DOS/TOS compatible partitions are supported. Main reason for it is that with DOS partitions and improved FAT16 it is possible that no extra RAM usage - so same as when using only floppies. Especially good for 512 KB machines. If there is need to use some media (disk, Flash card) with TOS (AHDI) partitions normal hard disk driver usage will work well, as in case of regular TOS. To get autoboot of integrated driver it must be set on specific media - with simple util program: 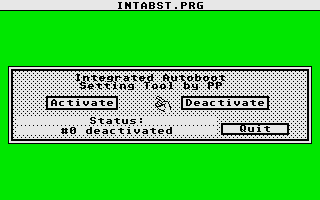 Program will deal with first ACSI target, so insert SD card in UltraSatan in proper order - card what want to set in first slot, or best insert only it. In case of multiple devices and if not sure which is which target, best to disconnect others. How to have 1GB DOS partitions, and 24 (or even 30) of them ? Use integrated partitioner. However, it is possible to create them with some better PC SW. Possible with Windows Disk Management - Create and format hard disk partitions. Important is to set partitions as FAT (what means FAT16), Allocation unit size: default . Max Simple volume size in MB: 1023 MB (to stay under 1 GB) . 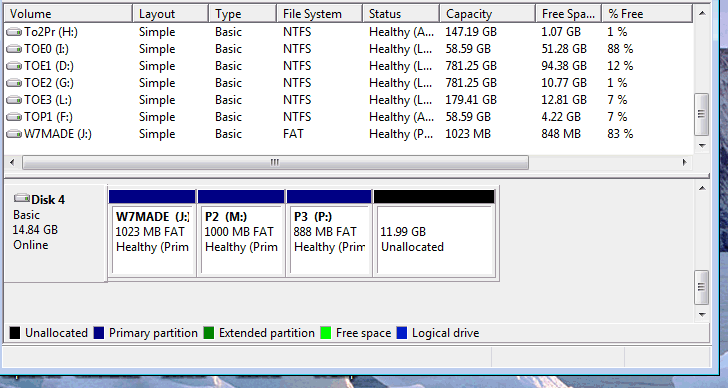 Disk 4 in this case is SD card attached via USB card reader. To make Windows to create and access multiple partitions on SD cards, as removable media will need to install CFAdisk or some other driver, what will correct that Windows stupidity :-) It is needed not only for formatting/partitioning but for regular file transfer purposes. After setting size will get this: 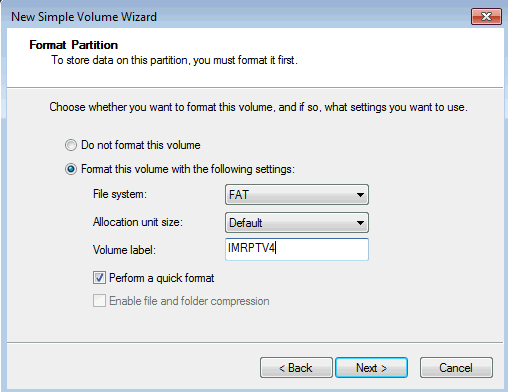 Set File system as FAT, what will be FAT16, Allocation unit size leave on default. Give some name for partition, but make it 8.3 format - so capitals only . Statesaves function Something better than hybernate. May save state of computer, running GEM program by key combination press, practically in any moment (except disk operation periods) . And later can restore that state with key comb. press in couple seconds. First thing what must be done is preparing space for statesaves: That's creating container file on one of partitions - and it must be non-fragmented. It it is empty, it is for sure not fragmented, so best to do it on such. With little util. PRG: 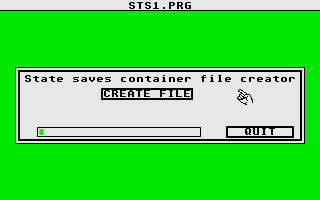 Just select partition and give some name, then OK, and it will be created. May take 1-2 minutes depending on speed of hard disk (Flash card) and amount of RAM in Atari. File size will be 10x size of RAM. So, for 512KB Atari it will be 5 MB, for 4 MB will be 40 MB long file. 10 slots available for 10 statesaves. Will need to reset Atari after creating statesave file, to activate function. Then pressing: Left Shift+Ctrl + 1-9 or 0 will perform statesave . That may take few seconds. Restoring state is with: Left Shift+Ctrl + F1-F10 . Any statesave will overwrite existing one on same number without any warning. If you want to preserve some of it, need to copy container file somewhere. This will work only with SW what uses TOS functions for peripheral access and other things. And GEM SW is mostly such. Of course can save Desktop too. Short demo of state saves and restore: Checking available RAM and membot In desktop click on Desk, Desktop Info. Will see this: 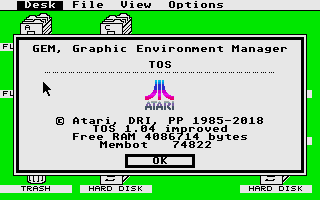 Membot is RAM address where user SW space starts. On screenshot above it is very low, because integrated hard disk driver uses no extra RAM. Even with 4 MB RAM some 512 KB SW, mostly games will not run if membot is too high, so is good to keep it low. Any resident SW, ACCessories and like will move membot higher. With integrated boot manager is easy to have different configs for different purposes. Virtual Floppy This is probably most interesting feature, which offers some really new possibilities, beside emulating floppy disks in some way. Page with many details: VF description, usage At moment - May 30. I still work on supporting SW. Basic functions are done, now working on features what make usage easier. Like transfer of container files - from other partition or computer. To make it work on new place some changes need to be done - in first place correcting image absolute adresses. And to check is it fragmented on new place. Why container file with multiple images at all, when we have hard disks with floders and like ? Mostly because of SW what runs well only from logical drive A: (B: sometimes) . And then may need multiple images, because it is on multiple floppies originally. User's disks with diverse data, own SW, etc. It may be nice to have some packages of disks with same data, SW type, which belong each to other. Then it can be practically categorized. And helps in transferring files to hard disk. PP, August 2022. |